Lots of trainers have different opinions on things in the fitness world, whether or not we need proper shoelaces for our shoes. But you all know, regardless of your fitness goals, you need to squat.
The question then becomes, “What type of squat should you do?”
The front squat and back squat are both good fundamental exercises. Both workout your major muscle groups in different ways. Here we are gonna figure out the good and the bad of each movement.
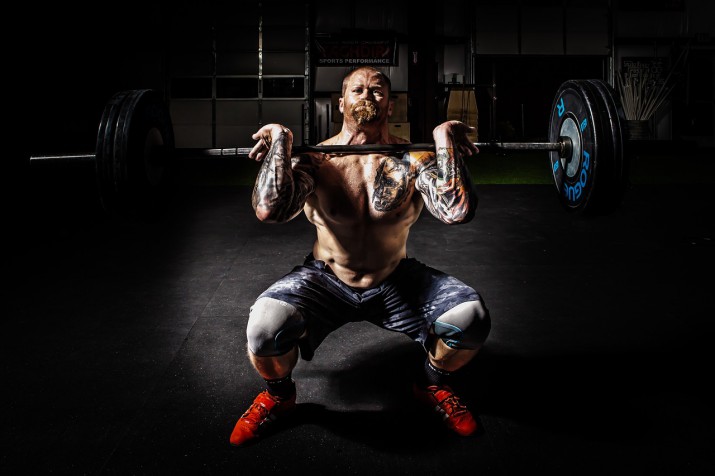
The main difference between the front squat and the back squat is where you position the barbell. When performing a front squat, the bar is held in the fingertips (or directly on the front of the shoulders).
Conversely, in a back squat, the bar rests right across your traps and rear delts (not directly on your shoulders), so the weight is loaded on the backside of your body.
Now, the front squat works your quadriceps much harder than your hamstrings and requires to really use your core to keep your body stable in an upright position compared to back squat. Back squat is a hip dominant exercise. You’re leading with the hips, so your torso is more inclined to lean forward as you perform the exercise.
Front squats because of how the weight is loaded, you’re positioned to be vertical. Don’t wanna lean forward on a front squat like how you do with a back squat or, you’ll lose your balance and drop the bar at your feet. The front squat is a more quad-dominant movement.
So both front and back squat work your entire body, just because your shoulders, core, and back muscles must engage to support proper form as your legs go through a full range of motion. That makes squats of any kind arguably the most functional and challenging exercise you can do.
How to perform the Front Squat
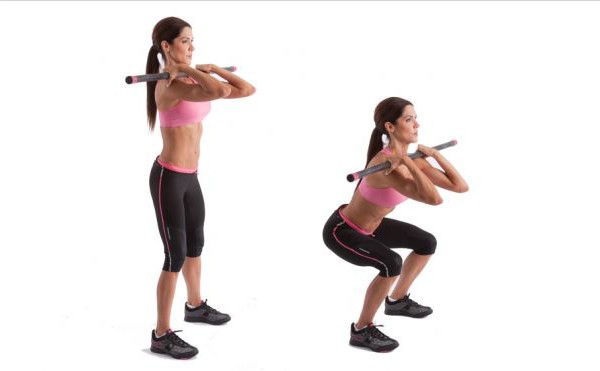
- Grasp the bar with hands shoulder-width apart and point your elbows forward so that you can position the bar over the tips of your fingers (palms face up). As long as you keep your elbows pointing forward, you will be able to balance the bar. Another way to do it is to cross your arms in front of you, holding the bar on the front of your shoulders (left hand in front of right shoulder, right hand in front of left, as pictured below). To do the classic front squat with the bar on your fingertips, you need a reasonable amount of flexibility through your shoulders and wrists to position the barbell correctly. If you don’t have it, the cross-arm version may be the better option for you at the moment.
- Lift the bar up and step back, setting your feet between shoulder-width apart. Turn your toes out slightly. Without letting your feet actually move, try to screw both legs into the floor as if you were standing on grass and wanted to twist it up—you’ll feel your glutes tighten and the arches in your feet rise.
- Bring your chest up and keep your core braced, while taking a deep breath. Keep your head straight. Your head, spine, and pelvis should form a long line
- Bend your knees, squat as low as you can while keeping your alignment straight and maintaining your upright torso position. Keep your elbows up steady and try to not to have them slip down. Your knees must stay in line with your toes. Trying to push them out and actively root your feet into the ground will all but ensure this.
- Push your hips and knees to return to standing, pushing through the middle of your feet and squeezing your glutes and hips forward up.
The benefit of Front Squats
- The vertical torso position makes the squat pattern safer for the lower back.
When people are back squatting, it’s common that they can’t maintain a neutral lumbar spine. They lean their torsos too far forward or let their hips rise faster than their shoulders as they come up out of the bottom of the squat. And their lower backs round over, putting the little muscles and discs in the lumbar spine at risk for strain.
In the front squat, your vertebrae are essentially stacked, so your torso moves almost straight up and down, avoiding shear forces that cause injury.
How to perform a Back Squat
- Approach a squat rack to grasp the bar with your hands as far apart as is comfortable. Step under the rack and squeeze your shoulder blades together and down, wedging yourself under the bar so that it rests on your traps or the back of your shoulders.
- With the barbell on your upper back, stand with both feet slightly wider than shoulder with to have a good stable base to stay under control throughout the movement.
- Keeping the chest up at all time, you wanna push your hips back first, then lower yourself down slowly by bending the knees and hips in slow controlled motion.
- Keeping your weight on both heels as you squat down until your upper thighs are parallel to the ground.
- Make sure your knees are aligned straight at all times
Mistakes
- Rounding the back
- Buckling the knees inward
- Tilting the ankles inward
Benefits of Back Squat:
- You’ll get much more strength gains faster, but there’s a high risk for lower-back injury.
- Unless you’re an athlete who competes in the sport of powerlifting or gets tested on back squat strength (as some power athletes do), it’s not an exercise that you must do.
Thank you for reading my article! I spent tons of hours researching on different sources adding my own knowledge. I hope I broke everything down in a very simple understandable way for everyone. I’m very passionate and serious about my training and I wish the best for everyone I come across. I’m an ISSA Certified Fitness Trainer with 3 years of Coaching experience, battle ropes enthusiast as well. I am also a Combining Supplements specialist, if you have any questions or concerns about anything please reach out to me by email: [email protected] or 313-784-4841


