
Get your inflammation-free pizza fix with this anti-inflammatory pizza crust recipe based on quinoa!
Why Quinoa
QUINOA pronounces “keen-was” is actually not a grain, but a pseudocereal. This means it is the seed of a broadleaf plant vs. true cereals which are the seeds of grasses. How cool is this: the quinoa plant is a relative to beets, spinach, and swiss chard – but we treat its seeds as we would a grain. There’s your fun fact of the day!
Quinoa is high in magnesium, as well as a good source of manganese, iron, copper, phosphorus, vitamin B12, and other essential minerals. Did you know it has the highest protein content of any grain? And yes, this protein is complete – because it contains all 9 essential amino acids – which is typically rare for plant-based protein sources. Oh! It’s also considered gluten-free!
It’s best to rinse all grains pre-cooking, and advisable especially for quinoa, in order to remove the bitter saponin coating on its outer hull that sometimes remains after processing.
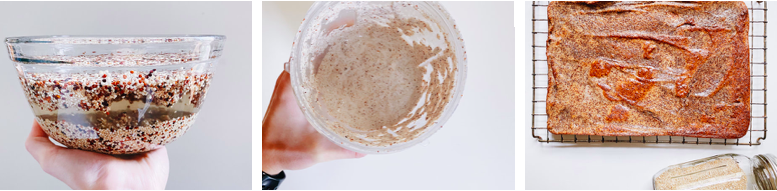
Here I have my dry quinoa in water giving it a nice bath, and next, I’ll use my nut milk bag or you can use a fine strainer, to drain it.
Then it’s cooking time!
I know it’s an extra step, but once you do it a few times, it’ll just become a habit in your prep process. (And trust me when I say you’ll notice a difference in your digestion when you make sure to soak and drain.)

Anti-Inflammatory Pizza Crust
Ingredients:
1 1/2 cups quinoa, soaked overnight and drained.
1/2 cup filtered water
1 tsp sea salt
~ 3 Tbsp cold-pressed virgin coconut oil
Optional: herbs of choice such as oregano, basil, Italian seasoning, etc.
Directions:
Step One: Soak your quinoa overnight.
Step Two: Preheat your oven to 450 degrees F.
Step Three: Drain the soaked quinoa in a nut milk bag or fine strainer. Add the quinoa, water, and salt to your blender and blitz until fully combined. Add more water if needed (the prepared mixture should have a similar consistent of pancake batter).
Step Four: Coat the base of two 8-inch cake pans (or one casserole dish) with the coconut oil, and heat in the oven until the oil just starts to bubble. Remove from the oven and pour the batter into your pan(s).
Step Five: Bake for 20 minutes, then flip the crust and bake for an additional 8 minutes. Add toppings and enjoy!
Gigi Kent Wellness


